Even though this past weekend was not my teams “turn” to demo something, the communication between us all has been great. I am really grateful for it. The other team has one person who is determined to do it all on her own and I think that is unfortunate. My team has been bouncing ideas off each other, cooperating when things need to be cut/packaged/marinated/what have you, and just keeping an open mind. I am really grateful for it.
Patti and I were talking over some ideas the other day. Seeing that she and I are in charge of demos, she’s the person I need to talk to the most. She had a steak wrap out to eat last week that she absolutely loved and thought it would be a good idea to try to re-create it. I had an idea for a panini or sandwich that was similar. I decided to make one item out of both ideas.
Continuing with the thought of introducing marinades that the customers may not be too familiar with, I choose to use the Wegmans Spiedie. Spiedie has a history, it’s definitely nothing new. I’m going to cheat here and copy and paste part of Wikipedia’s article on it so you get an idea. There’s just a little more than I care to condense. 😛
********************************************************************************************************
“The original idea for spiedie was brought by Italian immigrants to Upstate New York in the early 1920s. The specific origin of the spiedie is disputed. Traditionally the early Broome County spiedie was made only from spring lamb, but currently most commercial restaurants prepare spiedie using chicken or pork. The “chicken category” was added to the Spiedie Fest cook-off in 1987, and quickly became the most popular meat choice.
Origins (1939 – 1950)
Two men – Agostino “Augie” Iacovelli and Peter Sharak – are credited with the creation of the spiedie.[2]
Iacovelli, from Endicott, New York, began serving spiedie sandwiches in 1939 when he opened Augie’s, his first restaurant. He emigrated from Abruzzo, Italy (Civitella Casanova) at the age of 25 in 1923. His son Guido continued in the spiedie business into the 1990s, owning as many as 26 restaurants at the peak of his career.[3]
Iacovelli’s marinade, which he called Zuzu, originally was made simply from wine vinegar, water, lemon juice, garlic and mint. Italian spices, olive oil and minced onion were added later as regional tastes and the choice of meat began to vary.[3]
Sharak is also supposed to have invented spiedies. Apparently, patrons of Sharkey’s Bar and Grill were served lamb straight from the grill on its metal skewer with slices of bread. At the original Sharkey’s on Glenwood Avenue the spiedies are preceded, accompanied and followed by copious quantities of beer. Sharkey’s promotes itself as the birthplace of the sandwich in television commercials across the greater Binghamton area.[4]
Though the issue is disputed, Sharkey’s began serving spiedies in 1947, which makes Iacovelli more likely to have invented the dish first.[citation needed]
Growth of Popularity (1950-1990)
Through the 1960s, and 1970s, spiedies also became popular with the families of deer hunters since venison has a strong game quality and is similar to lamb. Many local families made their own marinade and enjoyed the wild game as a delicacy of back yard grills.
In 1975, Rob Salamida became the first person to bottle the sauce and sell it. He began by cooking spiedies outside a local tavern at 16. After writing letters for over a year the New York State Fair allowed him to have his own booth at the Syracuse Fairgrounds.
For 12 years he built his reputation at the fair. After a tornado nearly struck his stand in 1975, he decided it would be more lucrative and safer to bottle a spiedie marinade. Today, Salamida’s Original State Fair Spiedie Sauce is the highest selling spiedie marinade.[5]
Through the 1980s Danny “Moonbeam” (a local flat-track dirt motorcycle racing star) furthered the popularity of spiedies by selling them from porches of local bars at night in order to finance his motorcycle racing hobby. Lori Vesely featured spiedies straight off the grill at The Endwell Pub. Pork was especially good for long-grilling time making the bar-spiedie a favorite of both staff and customers.
In 1983 a few families got together and held a spiediefest[6] that was a tremendous hit. Coupled with a Balloon Rally it quickly grew to an annual 100,000 person festival (and also one of the top balloon rallies in the country).”
********************************************************************************************************
Now that you have a good idea, I’ll get on to the rest of the sandwich. Seeing that the marinade has Italian influence I figured I would keep it simple and use “cookie cutter” Italian ingredients: sliced mozzerella, arugula, and roasted red peppers. Ciabatta bread was the obvious choice for making an Italian panini. The ciabatta bread at work is awesome and I will use any excuse necessary to bring it home. I only used a portion of it to do these, but you can get 13-14 of these sandwiches out of one loaf.
Ingredients:
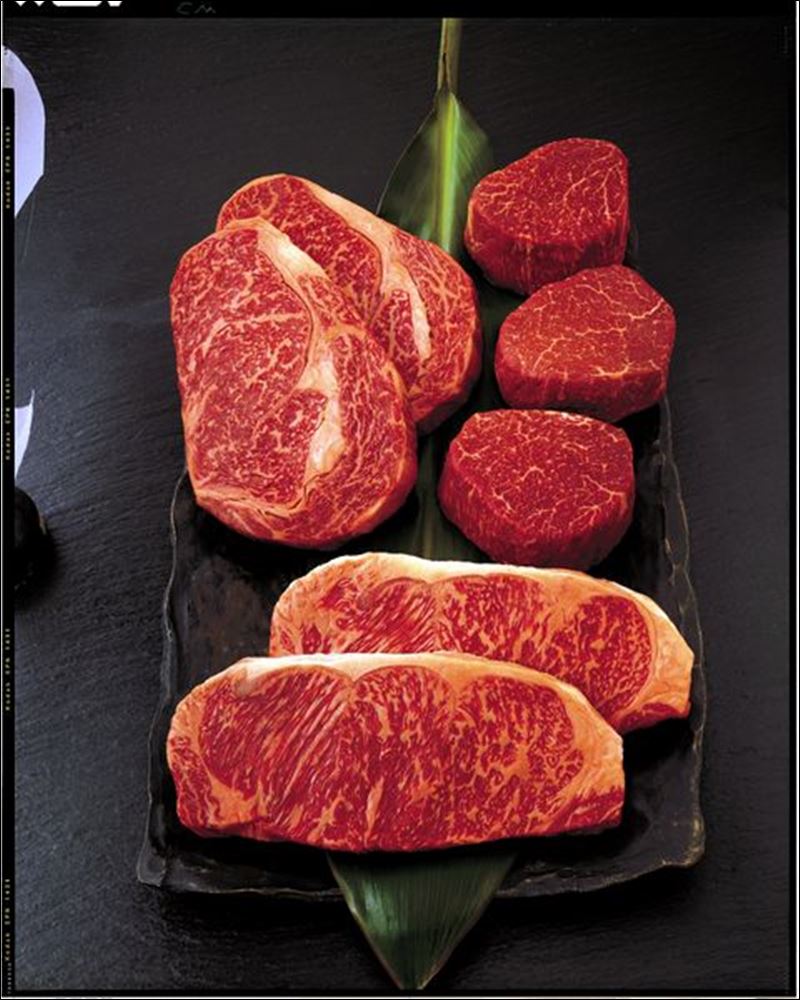
1 package perfect portion strip steaks
1/3 cup Wegmans Spiedie marinade
8 1/2” slices Wegmans ciabatta bread
2 slices mozzerella cheese
1 medium-large roasted red pepper
1/2 cup arugula
1 tbsp olive oil
How to:
Marinate the steak overnight in the 1/3 cup Spiedie marinade.
Preheat your panini grill. If you don’t have one, you can use a pan the same way you’d make a grill cheese.
Slice the bread and lightly brush the sides you are going to grill with the olive oil.
Grill the steaks about 2 minutes. They are thin and will be done. Remove from grill and slice each in half on the diagonal. This will make them just the right size for the bread.
Place one side of the oiled bread on the grill and top with steak, arugula, peppers, and cheese. Top with the other half and close the grill. In about 2-3 minutes, the bread should be perfectly browned and the cheese melted.
Price Breakdown:
8 1/2” slices of Wegmans ciabatta bread – $1.14
.60 lb package perfect portion strip steaks – $6.29
1 bottle Wegmans Spiedie marinade – $2.99
2 slices mozzerella – $0.79
Arugula – $0.54
1 roasted red pepper – $1.12
olive oil – on hand
Grand Total – $9.88 (without marinade)
Per Serving – $4.94 (two servings)
This was super easy and even easier to clean up. Due to the small size of the bread, each serving was two small sandwiches. This made them just the right size to hold in your hand without making a mess. Mom was more than glad to be my guinea pig for lunch yesterday.
The flavor imparted by the Spiedie was light and fresh. The herbs in it were great and didn’t over power everything else. Normally I’d add a little mayonnaise to a panini after I make it, but this didn’t need it. The bread toasted just right, still tender. The cheese melted just right and held the arugula and peppers in place. There is nothing worse than a grilled sandwich that just won’t stay together.
I’d say Patti and I had a good idea together. What do you think?
This slideshow requires JavaScript.
Posted in At Home Cooking, Beef, Bread, Cheeses, Cold Cuts, Fresh, Italian, Mild, Shopping For Ingredients, Veggies


